How to Measure Ring Size at Home
Shopping for a ring can be difficult, especially if you don’t know your ring size. And shopping online can make things even trickier. If you can’t try anything on, and you don’t know the size of your current rings, you may be left wondering how to choose a piece that actually fits.
Luckily, we’ve got you covered: if you’re looking for a new band but have no idea of your ring size, check out our easy instructions below. Whether you’re getting ready to place a KeepsakeMom order, or just want to figure out your ring size for future reference, using our helpful ring sizing guide couldn’t be simpler.
So here are our step-by-step instructions for how to determine ring size, along with a printable ring size chart—plus information on how to plug in your size when placing an order through KeepsakeMom.
How to Determine Your Ring Size
In order to measure your ring finger, we recommend first gathering the necessary tools. Fortunately, all you’ll need is a piece of string, a ruler, a pen, and a ring sizing guide that you can print out from our website.
1. Choose Your Finger
Since not every ring will be worn on your ring finger, knowing your ring finger size may not be enough. That’s why it’s important to measure the specific finger you’re shopping for. Not only will this help you choose a ring now, but it will also be handy for future reference when you’re out and about or shopping online and see a ring that fits your style.
2. Use the String Method
You may be tempted to measure your ring size by simply trying on an old ring, but this actually isn’t the most accurate way of finding your current size. That’s because certain band styles can fit differently based on their material. Think about your favorite pair of jeans—it’s probably your favorite because it fits differently than all your other pairs, which is largely due to its particular style and material.
When it comes to rings, for instance, a narrow-banded ring will sit differently on your finger joint than a wider band, which may fit more loosely despite covering more of your finger. Using the string method to measure your ring size will allow you to get a baseline size, which you can then adjust depending on the style of your band.
Utilize the string method as follows:
- Wrap the string around the base of your chosen finger.
- Using a pen, mark where the string overlaps to determine the length of your size.
- Lay the string out along a ruler and measure to the pen mark.
- Match your measurement to the closest ring size on the chart below.
- If you don’t have a ruler, you can also tie the string around the base of your finger and match the resulting circle to one of the circles on the sizing chart (details below).
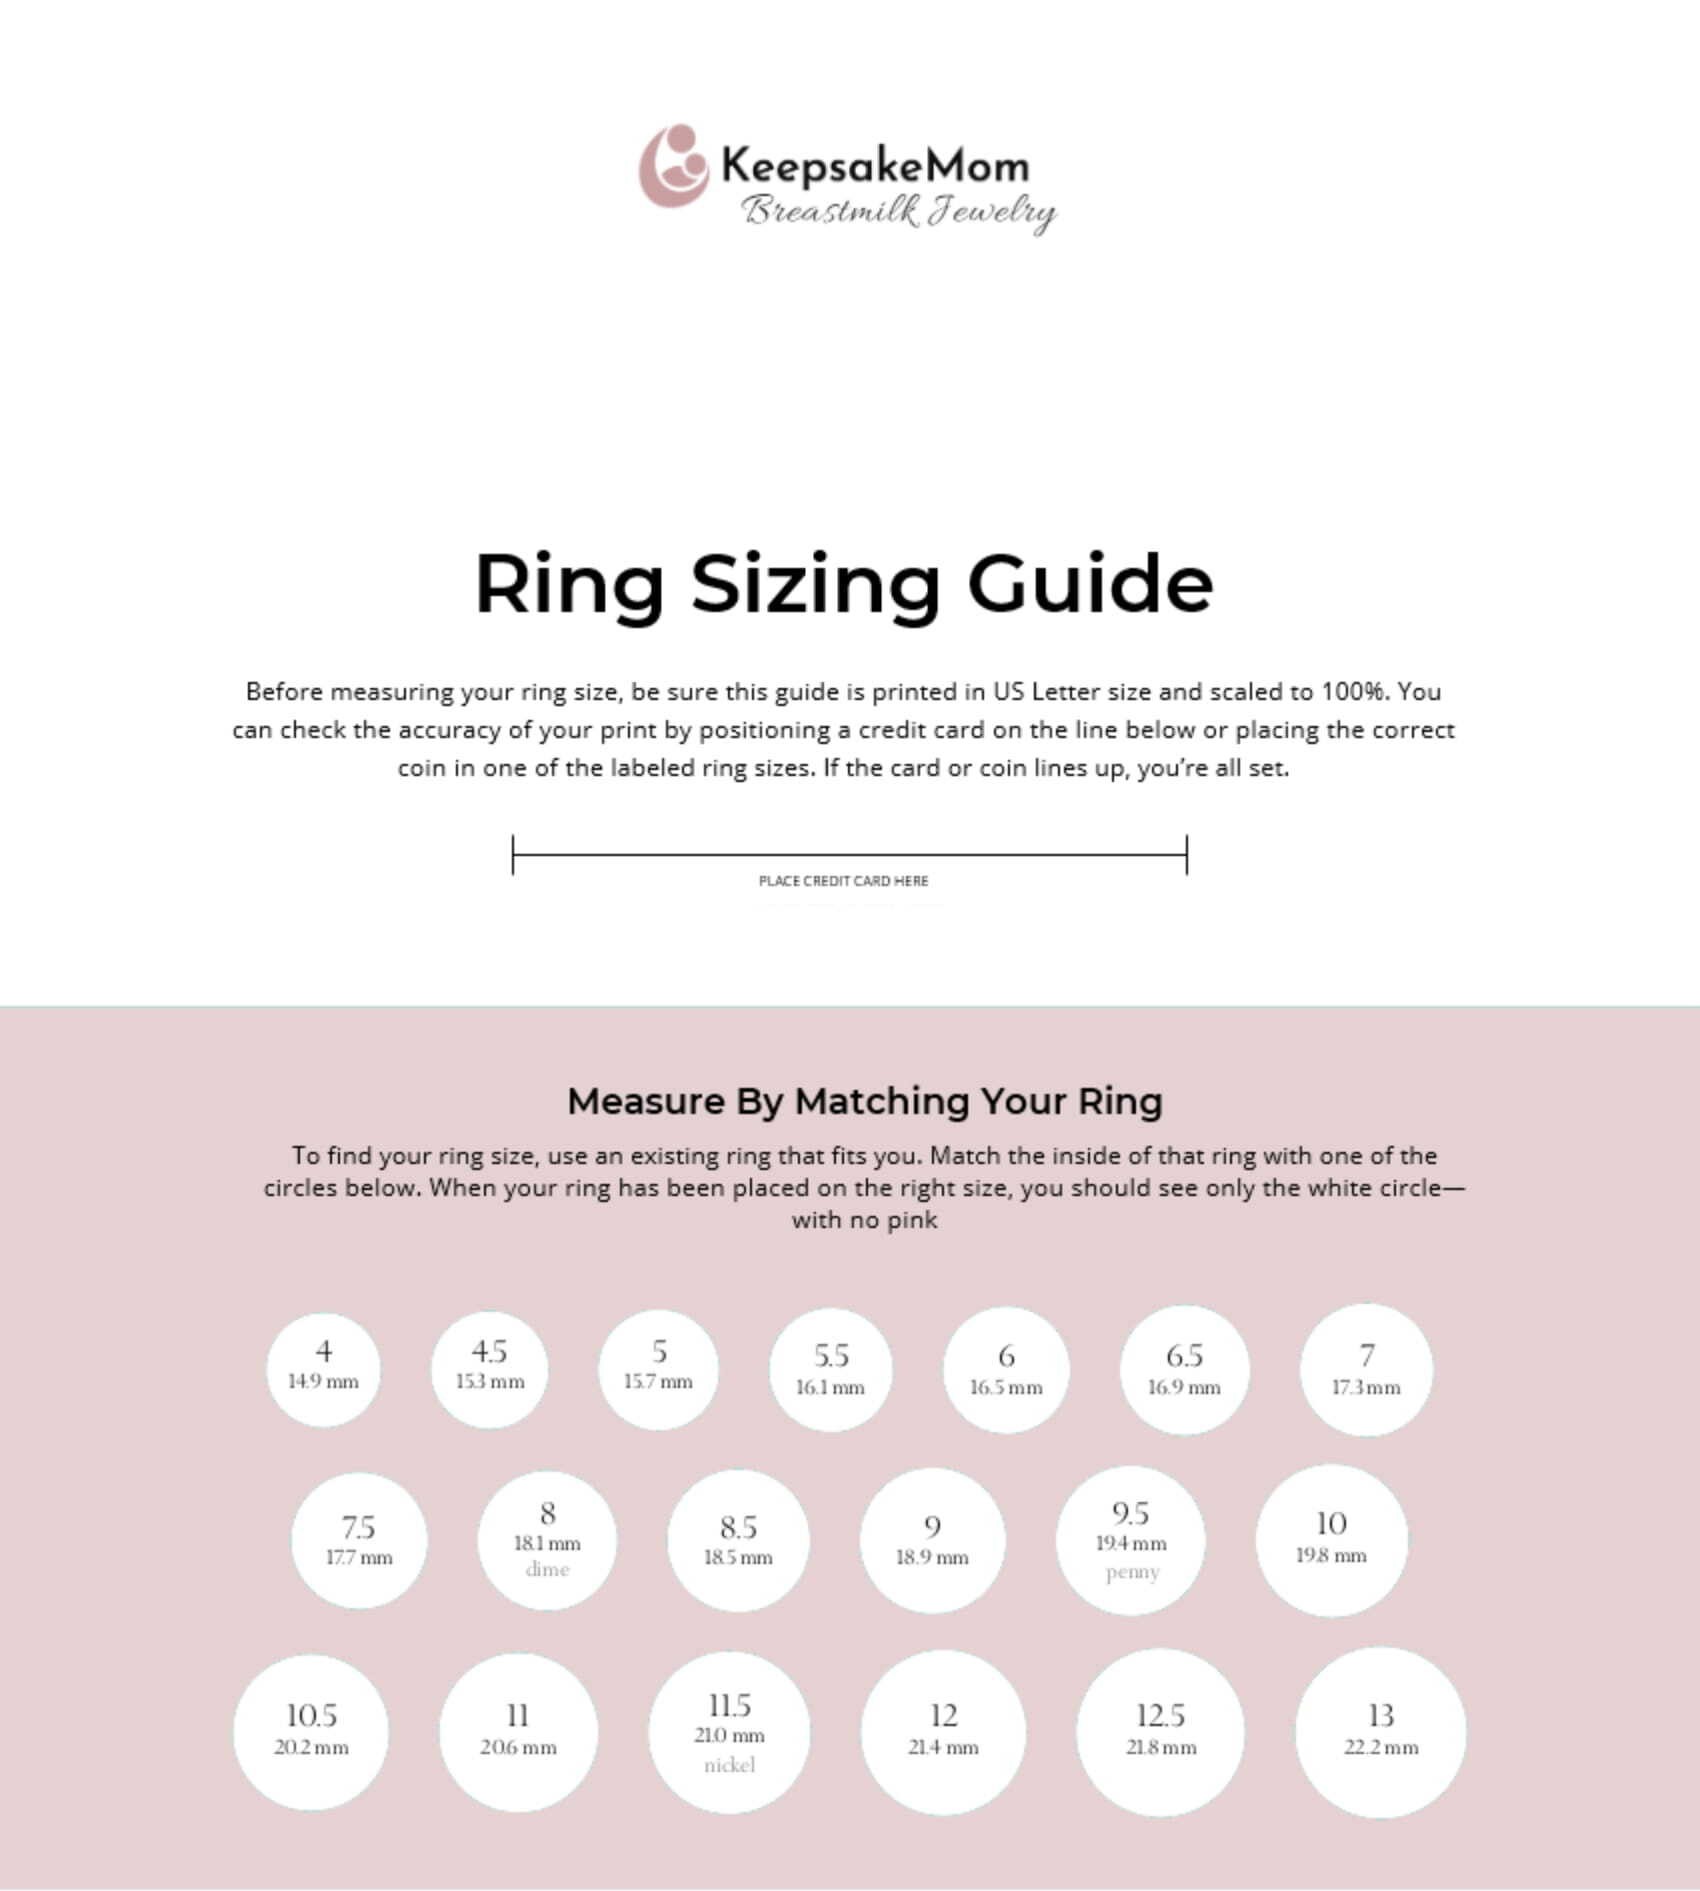
3. Follow This Sizing Chart
If you’ve measured your string to the pen mark, simply find the closest measurement on the chart below to determine your ring size. If you’ve tied the string around your finger, slide it off and use the circles on this ring sizing chart to determine your size. Simply place the string on each of the circles until you find a match—your ideal ring size will show only a white circle inside the loop of string, with no pink border.
| 4 – 14.9mm | 4.5 – 15.5mm | 5 – 15.7mm | 6 – 16.5mm | 6.5 – 16.9mm | 7 – 17.3mm |
| 7.5 – 17.7mm | 8 – 18.1mm | 8.5 – 18.5mm | 9 – 18.9mm | 9.5 – 19.4mm | 10 – 19.8mm |
| 10.5 – 20.2mm | 11 – 206mm | 11.5 – 21.0mm | 12 – 22.4mm | 12.5 – 21.8mm | 13 – 22.2mm |
4. Measure Your Finger Again
The last thing you want to do is get an inaccurate measurement because you were rushing or made a small mistake. Fortunately, you can easily avoid this by simply measuring your finger again to double-check your size.
Place an Order with KeepsakeMom
Knowing your ring size makes it so much easier to shop for jewelry online. And rings are such a special gift whether you’re shopping for yourself or someone else. If you’re a mom who’s looking for a meaningful new piece to wear on your finger, consider our beautiful collection of breast milk jewelry. We handcraft customized keepsakes as a way for mothers to celebrate their journey through breastfeeding and motherhood. Here’s how it works.
First, select your jewelry and design. Pick a piece that speaks to you, a piece that will help express your personal style while strengthening the bond between you and your baby. You can either choose from our carefully curated sets or create a custom piece completely from scratch. At this time, you’ll submit your ring size and decide on any inclusions to add to your breast milk jewelry.
After receiving your order, we’ll send you a kit including a labeled, leak-proof storage bag; a set of instructions; and a padded, prepaid envelope for returning your breast milk sample. Follow the instructions for collecting and sealing your milk, then place it in the prepaid envelope and drop it in your mailbox.
In just five to eight weeks, we’ll deliver your gorgeous new breast milk jewelry right to your door. It’s that easy!
Find Your Ring at KeepsakeMomSo what are you waiting for? Figure out your ring size and explore our one-of-a-kind breast milk jewelry at KeepsakeMom. Since every piece is beautiful, meaningful, and totally unique, there’s really no better time to view our rings, necklaces, earrings, and more to find the perfect breast milk keepsake for you and your child.